
Introduction
There’s something magical about homemade chocolate cake. The smell of the cake baking, the rich, decadent taste of the chocolate, and the joy of sharing it with loved ones—it’s a sensory experience that can turn an ordinary day into something special. Chocolate cake is more than just a dessert; it’s a tradition, a comfort food, and a way to celebrate life’s sweet moments. Whether it’s for a birthday, a holiday, or just an afternoon treat, a homemade chocolate cake always hits the spot.
Baking a chocolate cake from scratch is an art. While store-bought cakes may be convenient, there’s nothing quite like the satisfaction of crafting your own creation from the ground up. The rich flavor, the moist texture, and the soft crumb of a homemade chocolate cake can never be replicated by a box mix. Plus, making a cake from scratch allows you to choose the best ingredients, ensuring that every bite is filled with premium quality flavors.
In this article, we’ll take you step-by-step through the process of making the perfect homemade chocolate cake. Whether you’re an experienced baker or a beginner, this recipe will guide you to create a dessert that’s sure to impress. We’ll discuss everything from the ingredients you’ll need, to the equipment you’ll use, and tips and tricks to ensure your cake comes out moist, fluffy, and full of rich chocolate flavor.
But before we dive into the recipe, let’s take a brief look at the history of chocolate cake, its significance in different cultures, and how this beloved dessert became a staple at almost every celebration.
Table of Contents
A Brief History of Chocolate Cake
The history of chocolate cake is as rich and layered as the dessert itself. Chocolate as a flavor has been around for centuries, but its inclusion in cake form has evolved over time. Early forms of chocolate were bitter and used primarily in drinks, especially by the ancient Mesoamerican civilizations like the Aztecs and Mayans. These cultures valued cocoa for its supposed health benefits and believed it had mystical powers.
The first chocolate cakes as we know them began to emerge in the 18th and 19th centuries. It was during this period that chocolate began to be mixed with sugar, making it much more palatable. With the advent of baking techniques and tools, recipes for chocolate cakes started to appear in cookbooks.
However, it wasn’t until the 19th century, with the invention of cocoa powder by the Dutch chemist Coenraad Van Houten in 1828, that chocolate cakes really began to take their modern form. Van Houten’s process removed most of the fat from cocoa beans, creating a fine powder that was easily incorporated into baked goods. This revolutionized the way chocolate could be used in cakes, making it more accessible and popular.
The popularity of chocolate cake grew throughout the 20th century, with innovations such as the famous “Devil’s Food Cake,” which was designed to be especially rich and moist. Today, chocolate cake remains one of the most beloved desserts worldwide. It’s a staple at birthdays, weddings, and holidays, and is even served at casual family dinners and gatherings.
Ingredients
The secret to a great chocolate cake lies in the ingredients. While there are countless variations of chocolate cakes, this particular recipe focuses on using basic pantry staples that are easy to find and create a rich, delicious result. Let’s break down the key ingredients you’ll need to make this homemade chocolate cake.
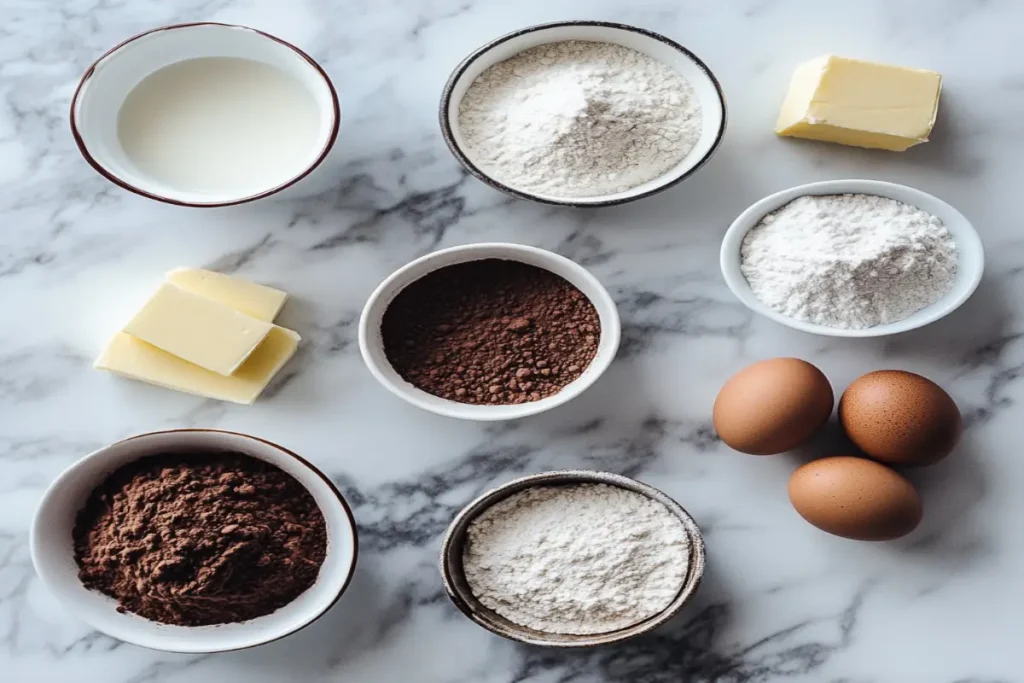
The Basic Ingredients
- All-Purpose Flour
All-purpose flour is the foundation of the cake’s structure. It provides the right texture for the cake, ensuring it’s light and fluffy without being too dense. You can also use cake flour for a softer, more delicate crumb, but all-purpose flour works perfectly in this recipe. - Cocoa Powder (Unsweetened)
The star of the show is the cocoa powder. Using unsweetened cocoa powder is crucial, as it allows you to control the sweetness of the cake. Look for a high-quality cocoa powder to get the richest chocolate flavor. If you want a slightly more intense chocolate flavor, you can opt for Dutch-processed cocoa powder, which has a smoother, deeper taste. - Baking Powder and Baking Soda
These two leavening agents work together to help the cake rise and become fluffy. Baking powder provides the initial lift, while baking soda enhances the texture and color of the cake. They work best in combination with the acidic ingredients, like the cocoa powder and buttermilk, to achieve a light and airy texture. - Salt
Salt is often an overlooked ingredient in desserts, but it plays an important role in balancing the sweetness of the cake and enhancing the flavor of the cocoa. A pinch of salt is all you need to bring out the richness of the chocolate. - Sugar (Granulated)
Sugar adds sweetness and moisture to the cake, balancing out the bitterness of the cocoa. You can adjust the sugar amount depending on how sweet you like your cake. For a more complex flavor, you can also experiment with brown sugar, which will add a subtle molasses flavor. - Eggs
Eggs are a key ingredient in binding the cake together. They also contribute to the cake’s moisture and help it rise. For the best results, make sure your eggs are at room temperature before adding them to the batter. - Milk (Whole Milk or Buttermilk)
The type of milk you use will affect the texture and richness of the cake. Whole milk will give the cake a nice, tender crumb. If you want a richer texture and flavor, buttermilk is an excellent option. The acidity of buttermilk reacts with the baking soda, creating a moist and tender cake. - Butter (Unsalted)
Unsalted butter adds richness and moisture to the cake. It’s important to use unsalted butter so that you can control the amount of salt in the recipe. The butter should be softened to room temperature for easy mixing. - Vanilla Extract
A teaspoon of vanilla extract adds a warm, aromatic note to the cake, enhancing the chocolate flavor without overpowering it. Always choose pure vanilla extract for the best flavor.
Step-by-Step Instructions
Now that you have all your ingredients ready, it’s time to start baking. The process of making homemade chocolate cake is simple but requires a little patience. Follow these easy steps, and you’ll soon have a mouthwatering chocolate cake to enjoy with family and friends.
Step 1: Preparing the Ingredients
Before you begin mixing the ingredients, take a moment to gather everything you need and prepare your equipment. This will make the process smoother and more enjoyable. Here’s what you need to do:
- Preheat your oven to 350°F (175°C). It’s important to preheat the oven so that it reaches the desired temperature by the time your cake batter is ready.
- Grease and flour two round cake pans (8 or 9 inches) or line them with parchment paper. This will prevent the cake from sticking to the sides and make it easier to remove after baking.
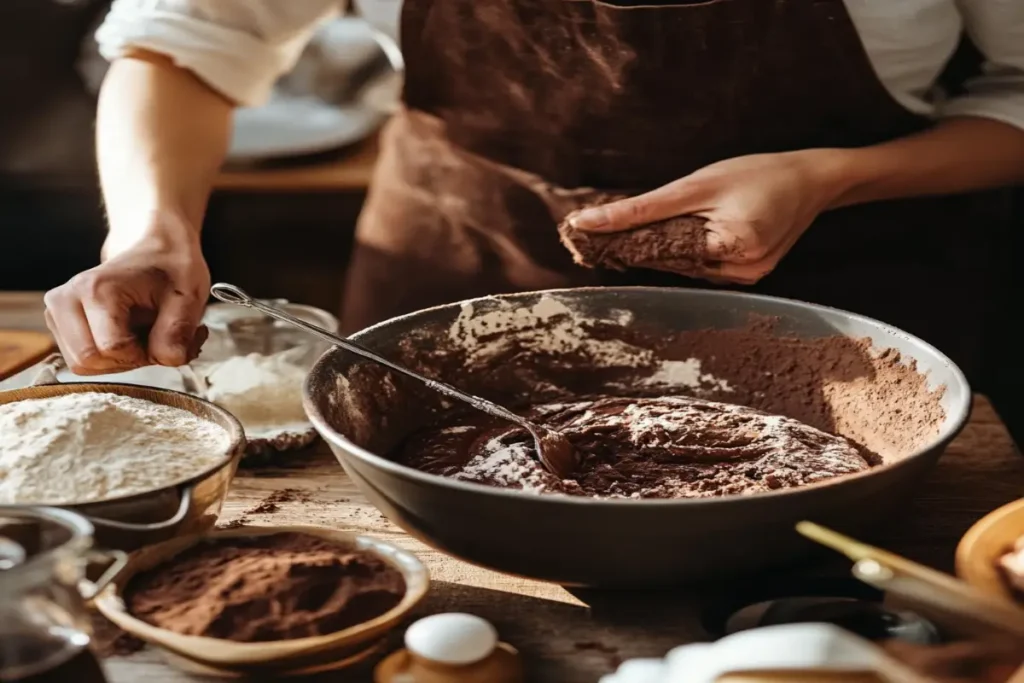
Step 2: Mixing the Dry Ingredients
- In a large mixing bowl, sift together the all-purpose flour, unsweetened cocoa powder, baking powder, baking soda, and salt. Sifting the dry ingredients ensures that they are evenly distributed and free from lumps.
- Set this bowl aside. The dry ingredients are ready, and now you can focus on the wet ingredients.
Step 3: Creaming the Wet Ingredients
- In another large bowl, use a hand mixer or stand mixer to cream the softened butter and granulated sugar together. Mix on medium speed for 3-4 minutes until the mixture becomes light, fluffy, and pale in color. This step is important for creating a smooth texture in your cake.
- Add the eggs, one at a time, beating well after each addition. The eggs should be at room temperature, as this will help them incorporate more easily into the batter.
- Add the vanilla extract and mix until everything is well combined. At this point, the wet ingredients will be smooth and fluffy.
Step 4: Alternating the Dry and Wet Ingredients
- Begin by adding about one-third of the sifted dry ingredients to the wet ingredients. Mix gently with a spatula or on low speed using your mixer until just combined.
- Add half of the milk (or buttermilk), and stir or mix until incorporated.
- Repeat this process, alternating between adding dry ingredients and milk until everything is combined. Start and finish with the dry ingredients. Be sure not to overmix the batter, as this can make the cake dense. Mix only until the ingredients are just incorporated.
Step 5: Adding Boiling Water or Coffee
- Add the boiling water or hot coffee to the batter. This might seem unusual, but the hot liquid helps dissolve the cocoa powder and creates a moist, soft crumb. The batter will become thin at this stage, but that’s exactly how it should be.
- Stir the batter gently to combine the liquid with the rest of the ingredients. Don’t worry about the thin consistency—this will ensure a moist, light cake.
Step 6: Baking the Cake
- Pour the batter evenly into the prepared cake pans. Use a spatula to spread the batter out evenly, ensuring that it fills each pan halfway.
- Place the pans in the preheated oven and bake for 30-35 minutes, or until a toothpick inserted into the center of the cakes comes out clean or with a few moist crumbs.
- Once baked, remove the pans from the oven and allow the cakes to cool in the pans for about 10 minutes. This helps them firm up slightly, making them easier to remove from the pans.
- After 10 minutes, carefully transfer the cakes to a wire rack to cool completely. Let them cool completely before frosting.
Step 7: Preparing the Frosting
While the cakes are cooling, you can prepare the frosting. This frosting is rich and creamy, the perfect complement to the moist chocolate cake.
- In a medium saucepan, melt the butter over medium heat.
- Stir in the unsweetened cocoa powder and cook for about 2 minutes, until the cocoa is well combined and slightly thickened.
- Gradually add the powdered sugar, one cup at a time, alternating with heavy cream. Stir continuously until the frosting is smooth and creamy. If the frosting is too thick, you can add a little more cream to achieve your desired consistency.
- Add the vanilla extract and mix to combine. Taste the frosting to check the sweetness and chocolate flavor. If it needs more sweetness, add a bit more powdered sugar.
Step 8: Assembling the Cake
Once the cakes have cooled completely, you’re ready to assemble your homemade chocolate cake.
- If the cakes have domed slightly during baking, use a serrated knife to trim the tops so they are flat. This helps the layers stack neatly and makes it easier to frost.
- Place one layer of cake on a serving plate or cake stand. Spread a generous amount of frosting over the top, smoothing it out with a spatula.
- Place the second layer of cake on top, pressing it down gently to secure it.
- Frost the top and sides of the cake with the remaining frosting. Use a spatula to create smooth edges or create decorative swirls for a more rustic look.
- If desired, you can garnish the cake with chocolate shavings, sprinkles, or fresh berries to add a decorative touch.
Tips and Tricks
Baking a homemade chocolate cake is a rewarding experience, but like any recipe, there are a few tips and tricks that can help you achieve the perfect cake every time. From ensuring your cake is moist and fluffy to decorating it like a pro, here are some expert tips to guide you through the process.
Achieving a Moist Cake
One of the most important factors in making the perfect chocolate cake is ensuring it comes out moist. Here are some tips to keep your cake tender and soft:
- Use Room Temperature Ingredients
Cold ingredients can cause the batter to seize up, which results in a denser cake. Let your eggs, butter, and milk come to room temperature before you start mixing the ingredients. This helps them blend together smoothly and creates a more consistent batter. - Don’t Overmix the Batter
While it’s tempting to mix the batter until everything is fully incorporated, overmixing can result in a dense and tough cake. Stir until the ingredients are just combined, and avoid overworking the batter. - Add Moisture with Buttermilk or Sour Cream
Using buttermilk or sour cream in your recipe adds extra moisture and tenderness to the cake. The acidity in these ingredients breaks down the gluten in the flour, creating a softer crumb. - Boiling Water or Coffee
Adding boiling water or coffee to the batter helps dissolve the cocoa powder, ensuring the cake remains moist. The hot liquid adds richness and helps create a tender texture. Don’t worry if the batter is thin—this is normal and will result in a perfectly moist cake.
Substitute Ingredients
If you have dietary restrictions or preferences, you can easily swap some ingredients to suit your needs. Here are some substitutions to try:
- Dairy-Free or Vegan Options
- Use non-dairy butter (such as margarine or coconut oil) in place of the unsalted butter.
- Substitute almond milk, soy milk, or oat milk for the whole milk or buttermilk.
- Replace the eggs with a flaxseed mixture (1 tablespoon ground flaxseed + 3 tablespoons water, let sit for 5 minutes to thicken) or use a commercial egg replacer.
- Gluten-Free Option
If you’re gluten-free, simply swap the all-purpose flour with a gluten-free flour blend. Make sure the blend includes xanthan gum or guar gum, which helps mimic the elasticity of wheat flour. - Lower-Sugar or Sugar-Free
For a lower-sugar option, you can reduce the amount of sugar by up to one-third without significantly affecting the texture. For a sugar-free cake, you can try using natural sweeteners like stevia or monk fruit sweetener, although the texture may be slightly different. - Flour Alternatives for a Healthier Cake
You can experiment with using whole wheat flour or almond flour for a healthier, nutty version of the cake. Keep in mind that using whole wheat flour will result in a denser cake, so you may want to combine it with all-purpose flour for a lighter texture.
Decorating the Cake
Decorating your homemade chocolate cake can turn a simple dessert into a showstopper. Here are some tips for frosting and decorating:
- Use a Cake Turntable
A cake turntable is a great tool for frosting the sides and top of your cake evenly. As you rotate the cake, use a bench scraper or offset spatula to smooth the frosting over the cake for a professional-looking finish. - Chill the Cake Before Frosting
After your cake layers have completely cooled, consider placing them in the refrigerator for about 30 minutes. Chilled cakes are less likely to crumble when frosting and make it easier to apply a smooth layer of frosting. - Create Decorative Patterns
You can use a piping bag with different tips to add decorative details to your cake. Try piping a border around the edges, rosettes on top, or writing a message for special occasions. If you don’t have a piping bag, you can also use a zip-lock bag with the tip of the corner cut off. - Add Garnishes for Extra Flair
For a finishing touch, you can add some chocolate shavings, cocoa powder, or sprinkles on top of your cake. Fresh fruits like strawberries or raspberries also make beautiful and tasty garnishes. If you’re feeling extra creative, drizzle caramel or melted chocolate over the top for a luxurious look.
Storage and Shelf Life
Properly storing your homemade chocolate cake will help keep it fresh and delicious for several days. Here are some storage tips:
- Storing the Cake
After decorating your cake, cover it loosely with plastic wrap or place it in an airtight cake dome to prevent it from drying out. If you don’t have a cake dome, you can also store the cake in an airtight container. - Refrigeration
If you live in a warm climate or want to keep your cake fresh for a longer period, refrigerating the cake is a good option. The frosting may harden slightly when chilled, but it will stay fresh for up to 5-6 days in the fridge. Be sure to let the cake come to room temperature before serving for the best flavor and texture. - Freezing the Cake
If you want to make the cake in advance, you can freeze the cake layers without frosting. Wrap each layer tightly in plastic wrap and foil, then place it in the freezer. It can be frozen for up to 3 months. To defrost, simply remove the cake from the freezer and allow it to come to room temperature before frosting. - Storing Leftover Cake
Leftover cake can be stored at room temperature for 2-3 days or in the refrigerator for up to a week. If you prefer a fresher taste, you can also freeze individual slices and thaw them as needed.
Conclusion
Making a homemade chocolate cake from scratch is one of the most rewarding and enjoyable experiences for both novice and experienced bakers alike. Whether you’re preparing it for a special occasion or simply indulging in a treat, the richness, moistness, and heavenly chocolate flavor of this cake will never fail to impress. There’s something special about creating a dessert from basic ingredients, knowing that each step contributes to the final result—a cake that is not only delicious but also made with love and care.
The combination of high-quality ingredients, a foolproof method, and a little creativity in decoration ensures that this chocolate cake will become a favorite in your baking repertoire. From the moment the cake begins to bake and fills your home with the irresistible aroma of chocolate, to the final slice shared with family and friends, every part of this process is a reminder of why homemade desserts are so special.
This cake is more than just a dessert; it’s a treat that can bring people together. Whether it’s a birthday celebration, a holiday gathering, or just a casual weekend afternoon, a slice of homemade chocolate cake makes any occasion feel extra special. And with the many ways to serve and enjoy it—whether paired with a hot drink, a scoop of ice cream, or a simple dollop of whipped cream—it’s a dessert that can adapt to any setting or preference.
As you make and enjoy this homemade chocolate cake, remember that it’s not just about the end result—it’s about the joy of baking and sharing something that’s truly homemade. So the next time you find yourself in the mood for something sweet, or if you’re looking to make a lasting impression at your next gathering, reach for this recipe. Your homemade chocolate cake will undoubtedly be the star of the show, delighting taste buds and creating memories for years to come.